CSV출력하기 목차
- 시트를 CSV형식으로 변환하기 (현재 열람중)
- 구글 드라이브에 CSV파일을 출력하기
1. 시트를 CSV로 변환하기
(1) CSV형식의 스프레드 시트를 작성 또는 준비한다.
시트이름은 CSV 로 작성

(2) Apps Script에서 코드를 작성한다.
이하 사양에 대해 간단하게 정리
변환할 시트이름으로 ActiveSpreadsheet를 가져온다
1행 : Header 헤더
2행부터 : data 데이터
헤더와 데이터는 A열 부터 입력된다.
헤더의 길이만큼 데이터를 출력한다. (헤더가 5개인 경우, 데이터는 E열까지 출력)
데이터가 하나도 없는 행이 있다면 그 이후는 출력하지 않음.
이외 체크처리는 없음.
const SHEET_CSV = getSheetByName('CSV');
const CELL_HEADER_FIRST = 'A1';
const CELL_DATE_FIRST = 'A2';
const STR_LINEFEED = '\n'; // UNIX, Linux, Mac
const STR_CARRIAGERETURN = '/r' // Mac OS X 이외의 Mac (Mac OS X 以外の Mac)
const STR_CARRIAGERETURN_LINEFEED = '\r\n'; // Windows
const STR_DOUBLE_QUOTATION = '\"';
const STR_COMMA = ',';
const STR_COLON = ':';
const INDEX_ZERO = 0;

// 스트레드시트에서 실행할 main function
function runPrintCSV() {
  let ui = SpreadsheetApp.getUi();
  let response = ui.alert("CSV를 출력합니까?", ui.ButtonSet.YES_NO);
  if (ui.Button.YES == response) {
    let csv = createCsvString(SHEET_CSV);
    ui.alert(csv);
  }
}

// CSV String 구하기
// @param ActiveSpreadSheet worksheet
// @return String csv
function createCsvString(workSheet) {
  let csv;
  let header = getHeaderValues(workSheet);
  let datas = getDataValues(workSheet, header.length - 1);
  csv = header.join(STR_COMMA);
  datas.forEach(data => {
    csv = csv.concat(STR_LINEFEED, data.join(STR_COMMA));
  });
  return csv;
}

// CSV의 Header값을 구하기
// @param ActiveSpreadSheet worksheet
// @return Array[Object] header header값
function getHeaderValues(workSheet) {
  let headerStartCell = workSheet.getRange(CELL_HEADER_FIRST);
  let headerEndCell = getRowEndCellHasValueFromRange(headerStartCell);
  let header = getRangeValuesWithCell(workSheet, headerStartCell, headerEndCell);
  return header.shift();
}

// CSV의 Data값을 구하기
// @param ActiveSpreadSheet worksheet
// @param int headerLength Header의 길이
// @return Array<Array<Object>> data data값
function getDataValues(workSheet, headerLength) {
  let dataStartCell = workSheet.getRange(CELL_DATE_FIRST);
  let dataEndCell = getColCellHasValueFromRange(dataStartCell, headerLength);
  let data = getRangeValuesWithCell(workSheet, dataStartCell, dataEndCell);
  return data;
}

// 시트 이름으로 ActiveSpreadsheet를 구하기
// @param String sheetName 시트 이름
// @return Sheet 시트 이름과 일치하는 시트 오브젝트
function getSheetByName(sheetName) {
  const activeSS = SpreadsheetApp.getActiveSpreadsheet();
  return activeSS.getSheetByName(sheetName);
}

// 행 가장 마지막 CELL을 구하기
// @param Range workRange 기준이되는 Range오브젝트
// @return Range cell 마지막 CELL
function getRowEndCellHasValueFromRange(workRange) {
  let cell;
  for (let index = 0; !workRange.offset(INDEX_ZERO, index).isBlank(); index++) {
    cell = workRange.offset(INDEX_ZERO, index);
  }
  return cell;
}

// 행X열의 가장 마지막 CELL을 구하기
// @param Range workRange 기준이되는 Range오브젝트
// @return Range cell 마지막 CELL
function getColCellHasValueFromRange(workRange, headerLength) {
  let cell;
  let hasColValue = false;
  for (let index = 0; ; index++) {
    for (let j = 0; j <= headerLength ; j++) {
      if (workRange.offset(index, j).isBlank()) continue;
      hasColValue = true;
      break;
    }
    // 행 값이 없으면 종료
    if (!hasColValue) break;
    cell = workRange.offset(index, headerLength);
    hasColValue = false;
  }
  return cell;
}

// a1Notation으로 Range의 값 구하기
// @param ActiveSpreadSheet worksheet
// @param Range startCell 좌측상단의 CELL
// @param Range endCell 우측하단의 CELL
// @return Array<Array<Object>> Range범위의 값
function getRangeValuesWithCell(workSheet, startCell, endCell) {
  let a1Notation = getA1Notation(startCell.getA1Notation(), endCell.getA1Notation());
  return workSheet.getRange(a1Notation).getValues();
}

// a1Notation의 그룹 구하기
// 예 fisrt = A1, second = B2, return = A1:B2
// @param Range first
// @param Range second
// @return String
function getA1Notation(first, second) {
  return first + STR_COLON + second;
}
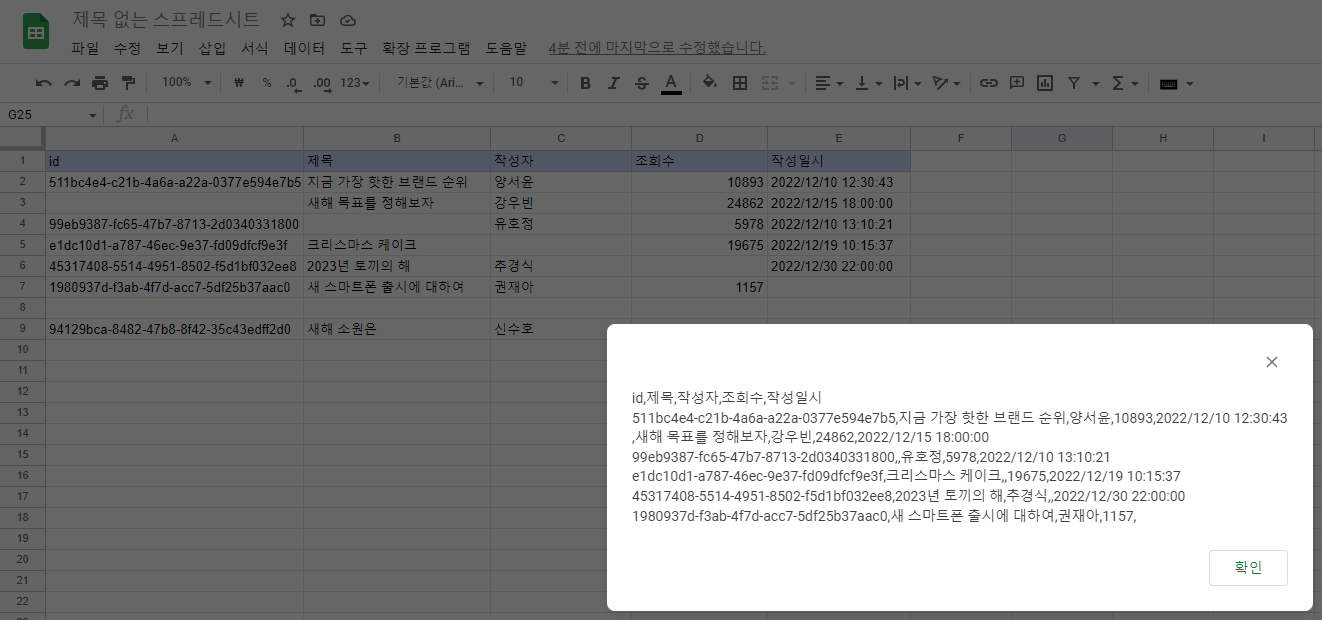
(3) runPrintCSV 함수를 실행해서 결과 확인하기


빈 셀은 공백으로 값이 표현되며 "," 로 구분자(delimite)가 들어가 있다.
8행은 값이 없으므로 이후 데이터는 출력하지 않음.

'Apps Script > Sheets' 카테고리의 다른 글
| [GAS:sheets]버튼으로 스크립트 실행 / 3. 도형에 스크립트 연결 (0) | 2022.12.30 |
|---|---|
| [GAS:sheets]버튼으로 스크립트 실행 / 2. 간단한 스크립트 작성 (0) | 2022.12.30 |
| [GAS:sheets]버튼으로 스크립트 실행 / 1. 도형 추가하기 (0) | 2022.12.30 |


